
Cloud adoption is still growing steadily, and cloud-based attacks are growing too. Following the early adopters many companies now use some form of cloud-based platform on a day to day basis, such as webmail, virtual machines and storage. Corporate environments are also increasingly more likely to be integrated with cloud systems to provide flexibility and scalability for IT departments, with less staff needed to maintain a large estate. Corporate strategies often feature cloud first or hybrid configurations, including projects to transition from on-premise to cloud only solutions. A very common scenario is to integrate with Office 365 and the Azure Active Directory as Microsoft based systems are generally ubiquitous within most organisations.
Onboarding into the cloud and spinning up services is made relatively simple, after a few clicks you can have your own virtual desktops, storage and a myriad of other services. However, this simplicity can lead to insecurity if they are left with default settings or poorly configured.
During busy projects, it is easy for staff to setup a service or third-party integration with more permissions or access than necessary. A good example seen in the past was with a third-party application that integrated with a company’s storage accounts and was not functioning correctly. In order to get it to work the vendor requested the firewall rules be removed, which did solve the problem, however the storage accounts were set to public access, and when the firewall settings were removed the storage was unwittingly exposed.
Paying attention to security, and using the security mechanisms available during setup, and throughout the lifecycle of your cloud services is essential to preventing attacks and guarding against data loss.
The responsibility for securing the cloud services sits squarely on the end user’s shoulders. Yes, the cloud vendors have responsibility for the underlying infrastructure, and they do take this seriously, but it is still up to the user to configure appropriately. Cloud vendors offer plenty of ways to harden and enhance your defences with layered security measures, but all too often customers are too busy, too lax, or just unaware of the risks and best practices.
This blog explores social engineering phishing attacks in some further detail, and highlights things to pay attention to when accessing cloud resources and how to help mitigate the risks.
Social Engineering to Gain a Foothoold
Many cloud services and associated web consoles will require a username and password for access, therefore obtaining valid credentials and/or session cookies is a key objective for an attacker. Many attacks are still perpetuated with social engineering and phishing. If an attacker can convince an unsuspecting user to click a link in a mail which runs a script, delivers a payload, or diverts a user to a malicious site, then chances are high that credentials can be stolen.
In general Internet users are more aware of phishing attacks, however the more convincing or targeted they are, they can still work. One variant method for phishing attacks utilises a reverse proxy, whereby attackers pass all the traffic for a valid website through a server under their control, which not only looks convincing to the end user, but also allows attackers to bypass additional protection mechanisms, such as multi-factor authentication. This man-in-the-middle attack allows attackers to steal logins, session authentication cookies and inject code in responses.
With corporate cloud services it is not uncommon for users Active Directory accounts to be used as part of single sign-on, so an attacker with a domain login potentially has access to other systems that might be exposed within a cloud subscription, such as remote desktop systems and webmail.
Targeting the right users is essential and some open source intelligence gathering is an obvious way to start. Tools such as LinkedIn, Facebook, Google and so on can help to gather departmental information and users of interest. To attack corporate users, delving into Twitter, news articles, and corporate websites can help too. All these can help an attacker to understand the people most likely to have credentials for a corporate cloud such as developers and IT staff. Does your CEO insist on having admin rights to everything?
Example of a Phishing Email
Below is a recent generic example of a phishing email. It is designed to look official and many people will have an Amazon Prime account. This may seem convincing, but there are several issues with the mail. Would you click on the links?
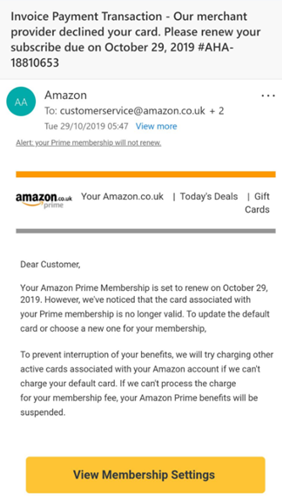
There are multiple ‘To’ addresses which seem odd and the distribution list mixes customerservice@amazon.co.uk, live.co.uk and hotmail.co.uk. By investigating the headers, we see more red flags, and note the ‘from’ address is not from Amazon:

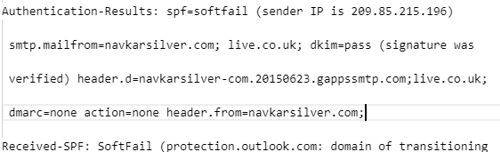
We can also see that there are SPF soft failures, as there likely wasn’t one configured:
Use of mobile devices can also make this attack easier as common red flags are sometimes harder to spot.
What to Look out for in Phishing Attacks
Attacks using email need to be convincing or deliver some message that incites action. There are often several obvious red flags that staff/users should be trained to spot and avoid. These include:
• Checking the ‘from’ email addresses – is it an odd-looking domain?
• Checking the ‘to’ email addresses – do they look correct, are there additional addresses in the list that look wrong?
• What is the content/subject? – is it a random urgent email, are these to be expected?
• Spam filtering – were there any SPF flags raised? – many mail servers will accept mail that comes in with a soft flag and deliver it to the end user. Implementing hard fails can result in additional admin overhead.
• Are there spelling mistakes? – poor spelling and grammar is quite common and a dead giveaway.
• If there are links in the mail, where do they go? – do they look valid or are they taking you somewhere that doesn’t look right?
A good rule to follow is if you think something looks odd and you do have an account at the provider always go to the providers URL directly rather than clicking any links in the mail.
The Golden Rule
If in doubt don’t click!
Phishing Attack with a Reverse Proxy
The following example shows a method to entice Azure cloud users to click a link using a reverse proxy to perform a man-in-the-middle attack to steal credentials and gain access to active session tokens.
It is designed to showcase how it presents the real website to the end user, which differs from the more traditional attacks where attackers would host a page that looks like a target website, or a form on the website. Instead this is the website and most importantly can bypass two-factor authentication. For brevity, this will not go into detail on all the steps as we are focusing on the reverse proxy part of the attack.
Step 1 – Setup a domain
Reverse proxy based phishing attacks will require a domain that is registered and configured such that it does not appear on blacklists and is less likely to arouse suspicion. When a fake mail is received it may look like it came from someone internally or a valid cloud service email.
Step 2 – Configure DNS
DNS settings should be setup correctly, pointing the domain to be used for the attack to the server hosting the proxy. Nominally this would simply be an A record or a CNAME. They are also required in order to set up a certificate.
Include the following DNS settings to help support wildcard certificates.
|
Record Type |
Host Name |
Value |
|
A |
www |
IP Address |
|
A |
@ (denotes the top level domain – i.e. procheckup.com |
IP Address |
|
CNAME |
* |
<domain name> |
You may also need another DNS entry to validate a certificate request – this helps prove you own the domain and may be something like the below
|
Record Type |
Host Name |
Value |
|
TXT |
_acme-challenge |
<string value provided by CA> |
Step 3 - Register a certificate
When users click a link from a social engineering mail most know to check for a certificate padlock icon on URLs when they are accessed. Many never check the certificate details. If it looks OK, its normally considered to be trustworthy.
There are multiple sites (even free ones such as https://letsencrypt.org/) which allow you to register a certificate for the domain you register. Once obtained this can be used with the proxy to ensure the man in the middle attack works seamlessly over HTTPS.
The acme.sh script can make registering certificates with multiple providers directly from the end point server easier. See https://github.com/Neilpang/acme.sh/wiki/How-to-install for further details. See also https://github.com/Neilpang/acme.sh/wiki/dnsapi for API capabilities. To use the vendor’s API you will need an account with the certificate provider and then to export the API key and other details.
An example to request a certificate might be:
acme.sh --issue --dns dns_namecheap -d *.example.com
After running you will be prompted to create a verification DNS record for your domain. Do this and then run:
acme.sh --renew -d *.example.com
Once registered you should have the certificate pack for your domain on your server. The script output will tell you where. For further instructions see https://wiki.acme.sh/
Step 4 – configure the reverse proxy
To demonstrate the reverse proxy attack we are using a highly flexible proxy called Modlishka. Among other things, this allows transparent proxying of multi-domain traffic through a single URL. Essentially it will proxy the target domain to be attacked – in this case https://portal.azure.com which is the main access portal for configuration of Azure subscriptions, and Azure Active Directory services.
See https://github.com/drk1wi/Modlishka for more details including installation instructions.
Modlishka needs a few things to run correctly:
• A working domain and DNS pointing the URL to the server.
• The certificates created earlier.
• A configuration file which contains all the settings when running an attack.
Researching the targeted cloud service is necessary in order to work out which URLs or target resources are used during an authentication attempt and add them to the configuration, along with any rules and parameters to capture credentials.
The proxy can be configured to identify individual access attempts, which it does by looking for a tracking identifier that is embedded in a link on the phishing email. Triggers can also be set to return a user to a specific page after the attack has completed.
Example configuration:
Most settings are self-explanatory, however breaking down the main elements of the configuration file below we are telling Modlishka to proxy via the domain we created and listen on all interfaces, and to target portal.azure.com. When a victim hits the proxy URL, other resources that need to be included in the proxy attack during the subsequent communications between the client and related Azure systems are also included as targetResources.
We can specify an identification parameter, in this case ‘ident’ to track specific targets. Scripted methods would be used to set this in the payload URL, with a unique ID for each email address that is successfully phished. An example link might be https://www.example.com/?ident=12345.
Specifying target rules essentially helps to modify attributes in the html response such as integrity headers. Tuning is normally required and will differ depending on the system being attacked.
We can also set a trigger URL which terminates the proxy session, following a successful login and redirect the victim to the alternate URL, which in the example is back to the Azure portal.
We are loading plugins to enable the attack, and this includes the hijack plugin, which allows us to capture credentials, and specifying a controlPanel URL path, which we can browse to whilst the attack is running to view them.
Setting credParams for Modlishka is required to pick up and populate username and password parameters. Once the parameters are understood regex can be used so that Modlishka knows which parts of the data to capture as it flows through the proxy.
Finally, certificates created earlier are provided so that browsing through the proxy gets a valid certificate and padlock in the browser. Other parameters can be set but these are not discussed here.
{
  "proxyDomain": "example.com",
  "listeningAddress": "0.0.0.0",
  "proxyAddress": "",
  "target": "portal.azure.com",
  "targetResources": "login.microsoft.com, portal.azure.com, aadcdn.msftauth.net, login.microsoftonline.com",
  "targetRules": " Comma separated list of 'string' patterns and their replacements - e.g.: base64(new):base64(old),base64(newer):base64(older)",
  "terminateTriggers": "this is a path or page that is loaded following successful authentication",
  "terminateRedirectUrl": "https://portal.azure.com/",
  "trackingCookie": "ident",
  "trackingParam": "ident",
  "jsRules":"",
  "jsReflectParam": "",
  "debug": true,
  "forceHTTPS": false,
  "forceHTTP": false,
  "dynamicMode": false,
  "logPostOnly": false,
  "disableSecurity": false,
  "log": "azure_phish.log",
  "plugins": "control_panel,hijack",
  "controlURL": "<a url path for accessing a control panel to view captured credentialsq>",
  "credParams": "<base64 encoded username and password params with regex>",
  "cert": <insert your wildcard certificate here>",
  "certKey": “<insert the private key here>",
  "certPool": "<insert the certificate authority certificate here"
}
Step 5: Start the proxy
Once the configuration is ready it can be run as follows:
./proxy -config config_file_name.json
Step 6: Attack
Using a tame mail server (or open relay), we send a mail with a template based on Azure. This is designed to look as real as possible and would either masquerade as Microsoft or another fake domain. Included in the official looking mail is a malicious link which diverts the victim to our proxy:
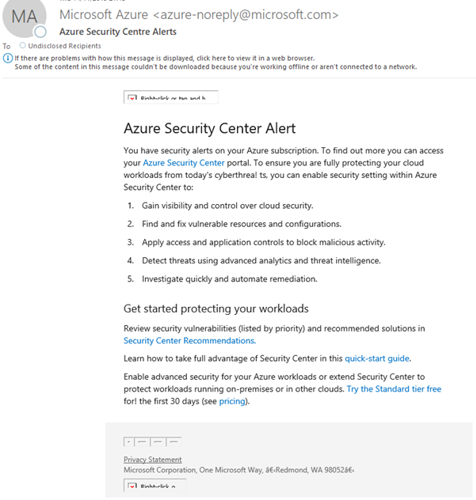
The following screenshot highlights why it is so important to check links before blindly clicking on them:
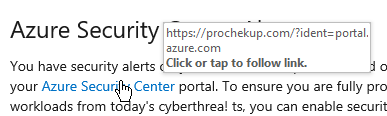
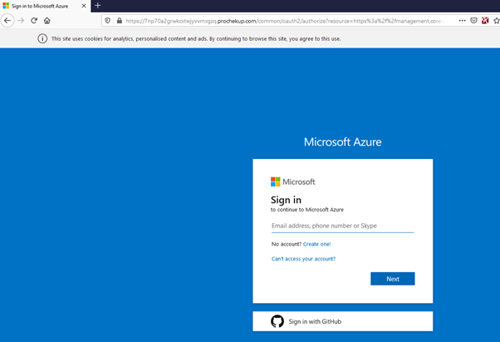
The user clicks the link in the fake email which takes them to the reverse proxy URL, which in turn responds by proxying to portal.azure.com, note the initial URL contains an ident tag to help identify individuals in a phishing campaign:

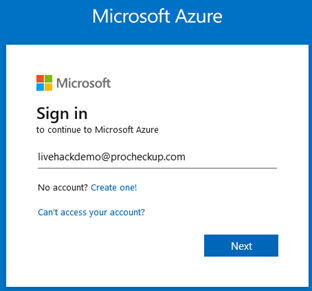
The proxy then hides the ident URL and pushes the user to a randomly generated subdomain but proxies and displays the content from the real Azure portal:

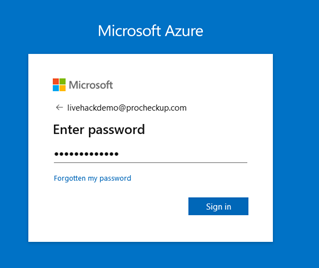
If the user continues to login the credentials will be captured.
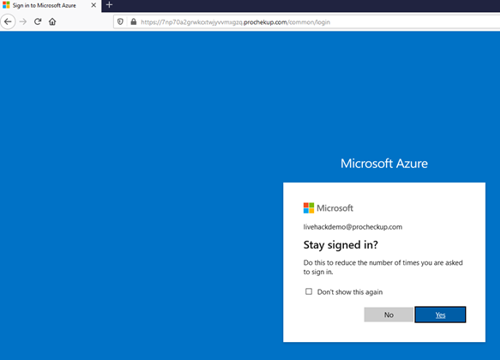
Because this is the real site, the victim will essentially get a normal user experience. If multi-factor authentication is in use it will work as normal and the attacker does not need to guess the code as the victim will enter it for them. After a successful login the portal can be loaded. Alternatively, a trigger can be set, for example once the user has logged in, we can send the user back to the normal Azure login screen, or you could divert to an error page and then back to the real login screen and the user hopefully is none the wiser.
After the phishing attack has happened once, and the trigger point is reached subsequent requests from the email link will be ignored and the victim will get redirected to the normal Azure login page.
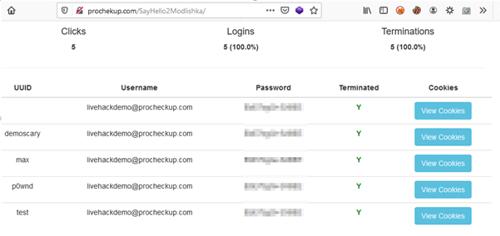
Step 7: Gather the credentials
Captured credentials can be seen through the Modlishka console, and used to access a valid session until it times out:
Summary
This example demonstrates how easy it can be to capture credentials, and authentication cookies with some social engineering using targeted phishing techniques. Cookies for cloud services may stay valid for some time, at least long enough for an attacker to access someone else’s cloud systems. From there the attacker has a foothold and the opportunity to enumerate and pivot to other parts of the cloud.
The scary thing about this attack is that even if 2FA is enabled, it doesn’t stop the authentication cookies being harvested, and makes it much easier for attackers as they don’t have to worry so much about this mitigation. In certain scenarios this could be a devastating attack leading to complete compromise of a victims Azure portal and associated services. It is important to note that 2FA is not broken, it has just been bypassed and it is always worth enabling any available layered defences.
The mitigations for this type of attack depend a lot on good user training, awareness and ensuring best practices and policies are being followed. The ability to bypass 2FA is a significant threat. Having a good mail configuration that prevents images being loaded, has anti-spam settings configured, with anti-virus scanning, and hard fails enabled will help. Think about how users access the cloud too, whilst SSO is useful it is still worth having separate logins to access resources other than email within a corporate cloud environment. Finally, and perhaps most importantly, always check links before clicking.

Categories