
Following on from the previous article, which covered prerequisites to obtain authenticated scan results using Tenable's standalone Nessus vulnerability scanner, part two covers specifics for configuring credentials. This includes tips and information to help verify credentials are working for Windows and Unix based systems.
It is important to know how to configure the credentials correctly for different scenarios. For example Windows might be using a local login or domain credentials, and Unix requires SSH authentication, but with Unix based systems, you may need to use different credentials to elevate privileges in order to get an administrative scan.
This article covers the majority of environments encountered. Some environments may not fit this model, and further guidance is available from Tenable here: https://docs.tenable.com/nessus/Content/NessusCredentialedChecks.htm.
Setting Credentials in Templates
Credentials are set when configuring a scan via one of the built-in templates. You can define your own templates too according to your needs. Various built-in options are available:
Once you have selected a new scan template you need to fill it in. When you are ready select the credentials tab. As a minimum you should see SSH and Windows options:
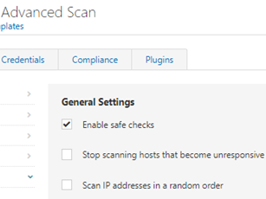
You can configure multiple credentials for SSH and Windows in the same scan. Nessus will try each login until it finds a username and password combination that works. This is particularly useful when auditing multiple sets of devices in a network, although you may decide to create a different template for specific requirements, such as one for Windows user workstations and another for servers or split by Operating System type for example.
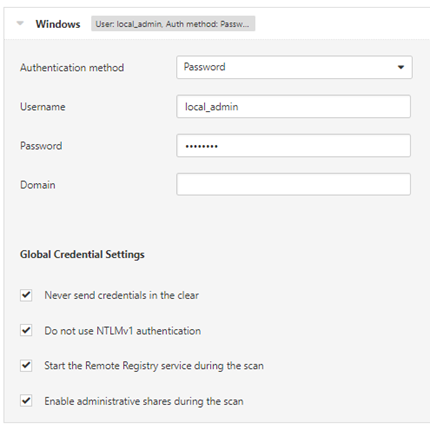
Configuring Windows Credentials
After selecting the Windows credentials option after which you will be presented with the configuration dialogue. In general, unless you have a good reason not to, tick all of the Global Credential Settings options:
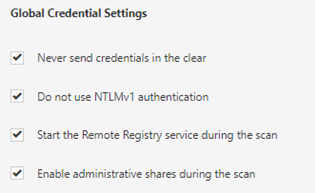
The first two are selected by default, and it is always best to attempt to start the remote registry, sometimes it can be stopped, and unless it is disabled for some reason, a simple start request will allow the full scan to work. Similarly enabling administrative shares will allow additional checks to complete successfully.
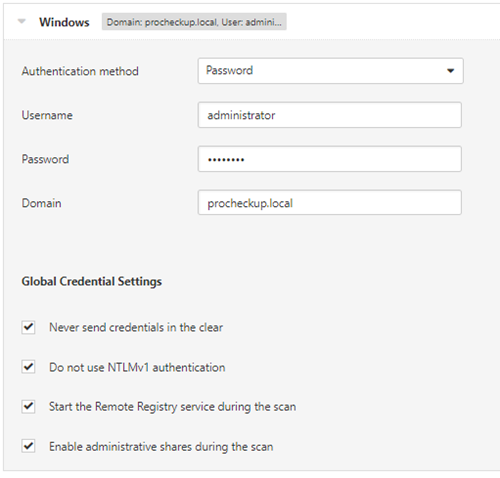
There are three scenarios to consider for the logins:
• domain joined with domain credentials,
• domain joined with local admin credentials, or
• local login on a non-domain joined standalone workstation.
Domain Name Tips
In general, if the machine is domain joined you can enter the domain name regardless of whether you are scanning with domain or local login credentials.
This can be the fully qualified domain name or a suffix, which is a short version of the domain as defined in the Active Directory and known as the UPN or User Principle Name. This is referenced within DNS on the Active Directory.
You can obtain details of the domain name and suffix by running "ipconfig /all" in a command prompt on a domain joined workstation. For example you may have something like 'procheckup.local' or you could use the suffix 'procheckup'.
If you are scanning a standalone machine you should not need to use the domain field, although you can enter the local machine name instead.
An example with a domain joined machine:
An example with a standalone workstation:
Configuring Unix/Linux Based Credentials
In this example we will stick with the more common password authentication method and provide examples for four scenarios:
• Login using a root user
• Login using a sudoer user
• Login using a standard user account and then switch to a root user
• Login using a sudoer user and then switch to a root user
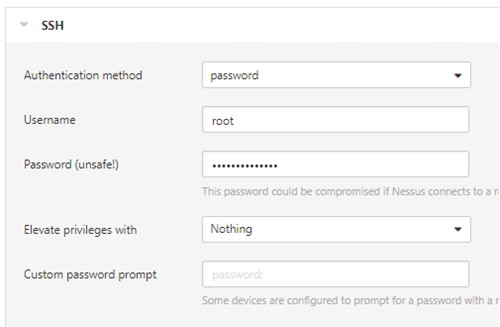
Root user accounts
For root users simply enter the root username and credentials:
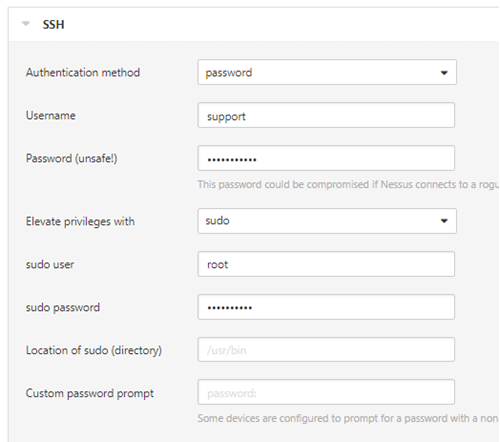
Sudoer user accounts
If you are using a sudoer account (i.e. an account that has root privileges assigned) enter the account you are elevating to as referenced in the /etc/sudoers file (this would normally be ‘root’ but could just as easily be something else, so always check) and use the same password as the normal user.
Note: If sudo is installed in a different directory other than /usr/bin then set it accordingly.
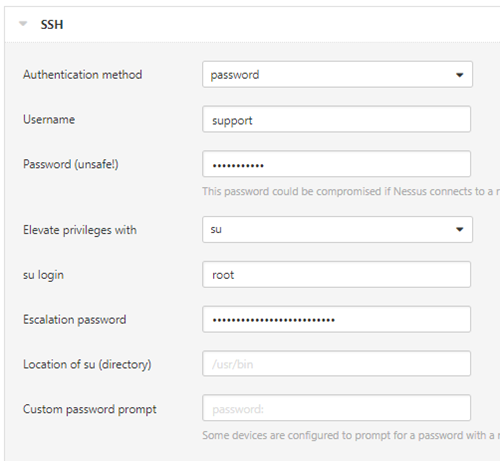
Normal user with su account elevation
If su is required, enter the normal user, and set the su user as root (or another full admin username), then enter the root password.
Note: If su is installed in a different directory other than /usr/bin then set it accordingly.
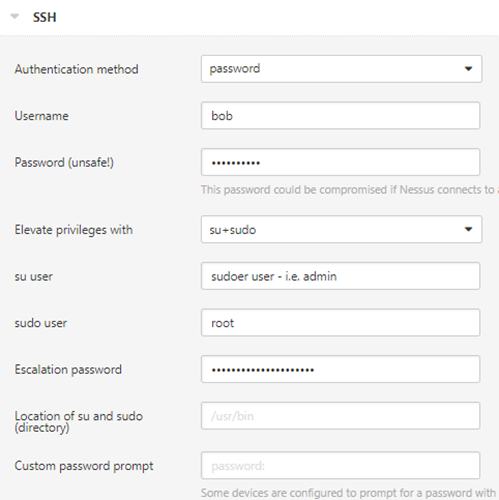
Normal user account with su to another account which has sudoer permissions
In more convoluted situations, it may be the case that another user must be invoked which has sudoer rights rather than the normal user. In which case select the 'su+sudo' option.
In this case following a normal user login, the authentication has to switch users "su", and then pass the sudoer credentials in order to run checks with administrative credentials.
Note: If su and sudo are installed in a different directory other than /usr/bin then set it accordingly.
There are variations in Unix systems which may still prevent the logins from working using the common settings, in which case refer to Tenable support for further guidance.
Verifying logins are working
After the initial configuration it is recommended to do a test scan against a small sample of systems to ensure the credentials and settings entered are working.
After starting the scans there are notifications you can check for to verify that logins are working correctly. These will appear in the scan output and it can sometimes take a while for these to appear so be patient.
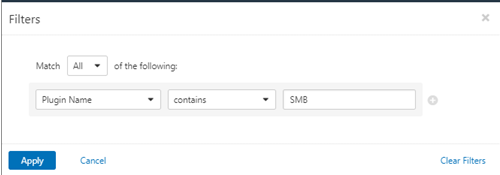
You can also use filtering to help with detection of issues. This can be done whilst a scan is running.
To add a filter, click the Filter drop down in the vulnerabilities tab:

Then select the ‘Plugin Name’ option, ‘contains’ and then the search term (i.e. ‘SMB’ or ‘Auth’), then click Apply:
Verifying Windows authentication
On Windows filter the vulnerabilities tab output to display anything with 'SMB' in it.
If you get any errors indicating the remote registry is not accessible, then there is likely to be a permissions or configuration issue. To resolve issues and assuming the host is up, check the remote registry is not disabled, that UAC settings are in place, and antivirus or other firewall and/or protection systems are not blocking scans - (see Part One for further details here).


If the login is wrong you will also see:

If the login is working you should see the following in the list


Verifying Unix authentication
With Unix based systems filter for 'Auth' and any authentication issues will be notified with the following output.

To resolve you will need to check the credentials for the user and/or any su or sudo settings are correct. Similarly if you have any AV or firewall configurations these should also be checked to ensure they are not blocking.
A successful login will show as follows:

Conclusion
As can be seen there are several steps and prerequisites to setup successful authenticated scanning depending on the operating systems used. However, once your Nessus credentials are configured you can obtain regular reliable authenticated audits, compliance checks, and vulnerability assessments of your systems.
Happy scanning!
Further information on Nessus is available here.

Categories